

By Protomold – Nobody’s Faster In The Short Run.®
We’ve talked in the past about corners and reasons to make them rounded (radiused) instead of sharp. Let’s talk about this in a little more detail and help distinguish between inside and outside corners, both of which should be radiused but for slightly different reasons.
Outside corners
The first thing to keep in mind is that an outside corner of your part is created by an inside corner of a mold, and vice versa. One reason we don’t make parts with sharp outside corners is because our molds are made by a vertical milling process that cannot cut a sharp inside corner. The radius of our inside corner (your outside corner) cannot be smaller than the radius of the cutter, which will vary somewhat with the depth of the cut.
Inside corners
Our milling process can produce sharp outside corners when making a mold, so you can have sharp inside corners. The problem is that sharp inside corners can create serious stresses in a part as it cools. The reason is simple. The rate of resin cooling is proportional to surface area. Any corner will have more surface area on the outside of the curve than on the inside. (Think about the advantage of the proverbial “inside track.”) On a radiused corner, there is always a difference between the two surface areas, but if the inside of the corner is square, it essentially has a surface area of zero, which maximizes the difference between the inside and outside surface areas.
Example of Sharp Corners vs. Radiused Corner
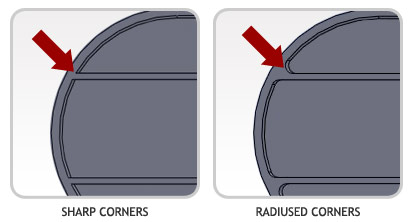 |
If the part consisted of two walls meeting to form an “L” shape, the part may tend to warp as it cools, reducing the angle between the two walls. If, however, the corner is in, say, a box whose shape keeps the walls from moving in relation to one another, instead of warping, they’d merely become stressed. The result could be cosmetic problems; a fracture or buckled floor.
In addition, because they are sharp, the outside corners of a mold half can “grab” the part within which they are forming a core, either making ejection difficult or risking damage to the part or mold. And finally, sharp corners can contribute to sink and weakened knit lines. So radius those corners!
Now that we’ve hopefully convinced you to radius corners, let us describe one situation where you should not radius a corner: at the parting line.
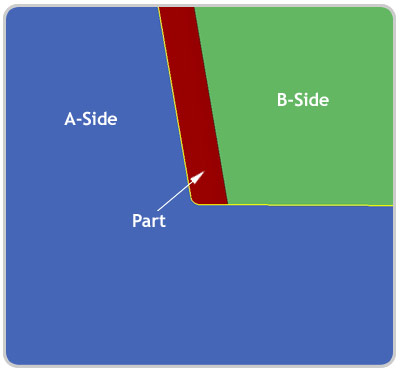 |
Fig. 1
If you look at Figure 1, you see the parting line where A- and B-Side mold halves meet to form the sharp edge of the part. In machining molds, there is always some tolerance, but slight movement of the parting line to the left or right will not change the geometry of the edge.
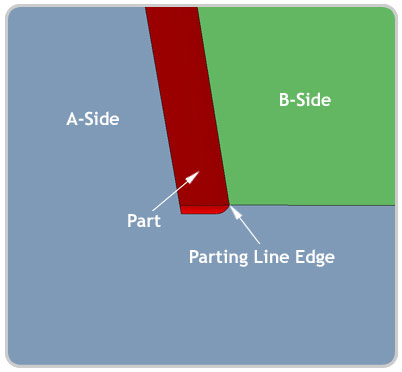 |
Fig. 2
In Figure 2, on the other hand, both the mold halves form the parting line edge, so any mismatch in the mold will leave a ledge, changing the shape of the part at the parting line. That’s one reason we recommend leaving the parting line sharp.
The views, opinions and technical analyses presented here are those of the author or advertiser, and are not necessarily those of ULProspector.com or UL Solutions. The appearance of this content in the UL Prospector Knowledge Center does not constitute an endorsement by UL Solutions or its affiliates.
All content is subject to copyright and may not be reproduced without prior authorization from UL Solutions or the content author.
The content has been made available for informational and educational purposes only. While the editors of this site may verify the accuracy of its content from time to time, we assume no responsibility for errors made by the author, editorial staff or any other contributor.
UL Solutions does not make any representations or warranties with respect to the accuracy, applicability, fitness or completeness of the content. UL Solutions does not warrant the performance, effectiveness or applicability of sites listed or linked to in any content.