By Protomold – Nobody’s Faster In The Short Run.®
Texture on a plastic part serves a variety of purposes from purely esthetic to purely practical. Whatever the goal, there are a few things to remember to ensure that you get the texture you want and that Protomold can effectively produce what you specify. On a surface lying perpendicular to the direction of mold opening, texture is relatively simple. (For features created by a side-action, the same is true for a surface perpendicular to the direction of side-action opening.)
Surfaces parallel to the direction of mold opening are more challenging. Consider what happens when you drag your knuckles across the surface of a brick. That’s pretty much what happens to a plastic part when its surface is dragged across the textured surface of an opening mold. The solution, of course, is to draft the surface so the mold surface moves away from the part surface as the mold opens. That’s true of any surface parallel to mold opening, but even more critical as the degree of texture increases.
Here are some guidelines for drafting textured surfaces:
- A 1-inch high rib with a smooth finish requires 1° of draft.
- The same rib with a PM-T1 finish requires 3° of draft.
- The same rib with a PM-T2 finish requires 5° of draft.
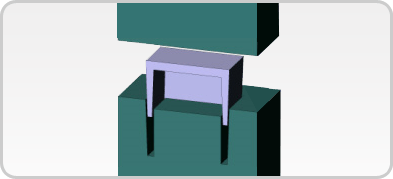
These requirements can impact other aspects of your design as well. Take, for example, the “scoop” shown in figures 1 and 2. In Figure 1, the sides of the scoop are ribs formed in grooves cut into the B-side mold half. The two walls of the groove must be drafted in opposite directions to allow the part to be ejected. As a result, the side walls get thicker toward the back wall of the scoop.

Fig. 1
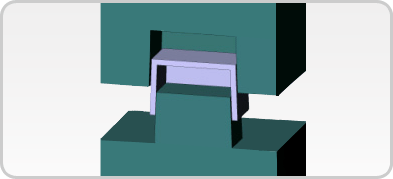
In Figure 2, the side walls of the same scoop are formed between a core in the A-side mold half and a cavity in the B-side. In this case, the two mold surfaces that form the side walls of the scoop are drafted in the same direction, resulting in side walls that are of even thickness from end to end.

Fig. 2
Both versions of the part have the same side-wall draft, but the one shown in Figure 2 is the better design since it maintains even wall thickness.
There are several other points to remember when designing textured surfaces:
- Because texture is typically created by processes like bead blasting the mold faces, it may be impossible to texture ribs formed in deep, narrow grooves in a mold. This is one more reason to use the core/cavity approach rather than a deep-groove rib approach for forming walls.
- Very thick walls may shrink significantly as they cool, pulling the surface away from the mold face before it has fully cooled, thus failing to properly texture the surface. If your part has mixed thick and thin areas there may be ugly variations in texture. This is a function of part design and can’t be processed out.
- Very thin, textured walls may adhere too aggressively to the mold face and be damaged during ejection.
Note that the design guidelines pertaining to textured surfaces are similar to those for any part, except that, when you add texture, you must increase draft and pay more attention to wall thickness.
The views, opinions and technical analyses presented here are those of the author or advertiser, and are not necessarily those of ULProspector.com or UL Solutions. The appearance of this content in the UL Prospector Knowledge Center does not constitute an endorsement by UL Solutions or its affiliates.
All content is subject to copyright and may not be reproduced without prior authorization from UL Solutions or the content author.
The content has been made available for informational and educational purposes only. While the editors of this site may verify the accuracy of its content from time to time, we assume no responsibility for errors made by the author, editorial staff or any other contributor.
UL Solutions does not make any representations or warranties with respect to the accuracy, applicability, fitness or completeness of the content. UL Solutions does not warrant the performance, effectiveness or applicability of sites listed or linked to in any content.


