

By Protomold – Nobody’s Faster In The Short Run.®
Normally, when we think of a pair of mating plastic parts we think of left and right, front and back, or top and bottom, with the two parts being distinct from one another. There are, however, situations in which two mating parts may be exactly the same. In other words, you could reach into a bin of identical parts, pull out any two and join them. The advantages of such self-mating design include lower manufacturing cost—the parts can be made in a single mold instead of two or more – and lower cost of maintaining inventory.
Clearly, if mating parts can be made identical, it makes sense to do so. The problem is that parts with potential to be self-mating are not always easy to recognize. Their geometry can range from very simple to very complex, but one trait their assembly will always share is rotational symmetry (as opposed to bilateral or mirror image symmetry). An object with rotational symmetry is one “that looks the same after a certain amount of rotation.”
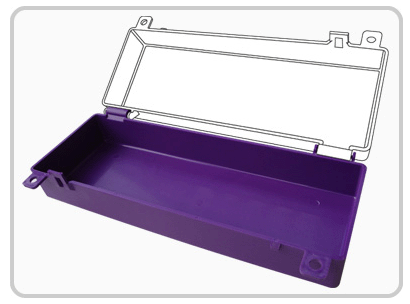
Take, for example, the assembled box shown in Figure 1. In its simplest form – a rectangular box – the part would be both bilaterally and rotationally symmetrical. With the addition of hinges at the back and latches at the front, however, the assembly remains rotationally symmetrical but is no longer bilaterally symmetrical. It is the distribution of hinge parts on the back edge and latch parts on the front edge that makes this part self-mating.
design where the assembly is rotationally symmetrical.
If the designer hadn’t been looking for a way to make a self-mating part, there could have been two distinct parts. One would have had two hinge hooks and two latch tabs, while the other had two hinge pins and two latch posts. By designing the part with one of each, the designer eliminated the need for a second mold. As designed, when you put two of these pieces together, the hook component of each one’s hinge (left rear) engages the pin of the other half’s hinge (right rear), and the latch tab on each half (front left) engages the mating part’s latch post (front right). The result is a single part that serves as either top or bottom.
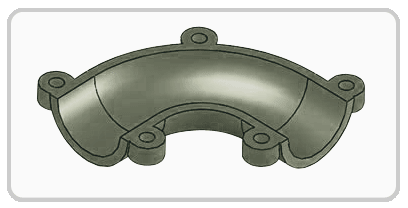
A second example is the elbow shown in Figure 2. This bent tube is molded in two halves to allow easy ejection, and the two parts are then bolted together to form a finished tube. If the designer wanted the parts to snap together, this design could have been modified to have an even number of connectors with both male and female connectors on each part. As with the box in Figure 1, when one part is rotated, its male connectors would align with female connectors on the mating part and the two could be snapped together.
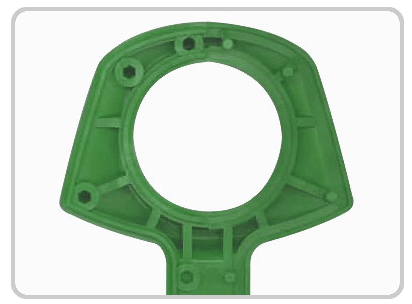
A more complex example is shown in Figure 3. Posts on the right side of the part align with holes on the left so that two identical parts can snap together to form the completed device.
It might have been possible to design the part to be molded in one piece instead of two, but this would have either left some very thick areas, violating some basic rules of design for injection molding. Alternately, the one-piece part could have been thinned to prevent those problems, but that might have impacted handling. Designed in two parts, the walls can be kept thin and easily moldable while maintaining the rounded shape for easy handling. And because it is hollow, the assembled part is light and the cost of resin is minimized.
Opportunities to design self-mating parts will be relatively rare. Tops and bottoms and backs and fronts usually serve different purposes and are designed accordingly. But when you have a symmetrical assembly that needs to be made in two or more parts, often to allow the inside to be hollow, you may have an application for self-mating design. The biggest challenge is usually the mating surfaces and connectors.
In all three parts shown above, the mating edges are in a single plane, but that need not always be the case. Obviously if there is a protruding edge at some point on the part, it will have to meet a recessed edge on its rotated mate just as male and female connectors align. Achieving this alignment begins in the drafting phase of development and ends with testing on real parts.
The views, opinions and technical analyses presented here are those of the author or advertiser, and are not necessarily those of ULProspector.com or UL Solutions. The appearance of this content in the UL Prospector Knowledge Center does not constitute an endorsement by UL Solutions or its affiliates.
All content is subject to copyright and may not be reproduced without prior authorization from UL Solutions or the content author.
The content has been made available for informational and educational purposes only. While the editors of this site may verify the accuracy of its content from time to time, we assume no responsibility for errors made by the author, editorial staff or any other contributor.
UL Solutions does not make any representations or warranties with respect to the accuracy, applicability, fitness or completeness of the content. UL Solutions does not warrant the performance, effectiveness or applicability of sites listed or linked to in any content.