

By Protomold – Nobody’s Faster In The Short Run. ®
Ejector pins are the “bouncers” of the injection molding world. They apply a force to eject a part from the mold, and in some cases can leave marks. At Protomold, our goal is to design and position pins to minimize their effect on your parts, and while Protomold typically determines pin placement, customers get to sign off on pin locations before an order is finalized.
Pins are located in the B-side mold half, the side in which the part will stay when the mold opens. Once the mold is opened, the pins extend into the mold cavity, push the part out, and then retract, allowing the mold to close and be refilled.
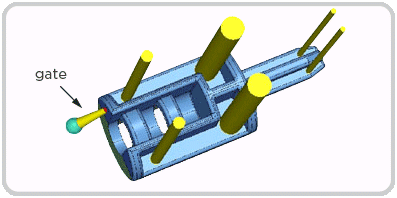
Protomold uses round ejector pins, and their placement depends on a number of factors. Obviously the shape of the part is one (see Figure 1). Factors like draft and texture of sidewalls and depth of walls and ribs can increase the likelihood that areas of the part will cling to the mold. Resin choice can also affect pin placement or size. Some resins are “stickier,” requiring more force for release from the mold. Softer resins may also require the use of more or wider pins to spread force and prevent puncturing or marring of the cooled plastic.
In Protomold’s process, the ends of ejector pins are flat and perpendicular to the direction in which the pin moves. To be effective, the pins need a flat “pad” to push against, and the surface of the pad must be perpendicular to the direction of pin movement. If the part surface at that location is textured, the smooth surface of the pad will be apparent. And if the surface of the part is not parallel to the flat end of the ejector pin, the cosmetic impact will be even more obvious.
In a traditional steel production tool it may be possible to machine the end of the pin to match the contour of a part surface that is not perpendicular to the direction in which the pin moves, producing a contoured pin. Protomold’s process, however, does not support the production of contoured pins. If a pin needs to act on a part surface that is not parallel to the pin-end, there will have to be a pad provided that is in the same plane as the pin-end rather than that of the part surface. Because it is in a different plane than the part surface, the pad may be raised slightly above the part surface at one edge or recessed slightly below the part surface at one edge. Configuring a pad that is slightly recessed into the part surface is the default configuration for pins on contoured surfaces.
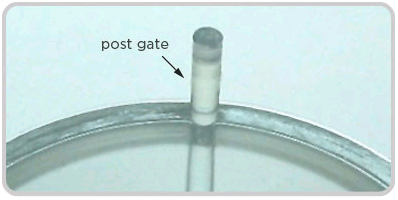
A post gate produces an extreme example of a raised ejector pad (see Figure 2). In cases in which an edge gate cannot be used, resin is injected through an extension of an ejector pin channel. When the part has cooled, the ejector pin pushes against the resulting post and, in the process, clips off the runner. The post is typically removed from the finished part in a secondary operation.
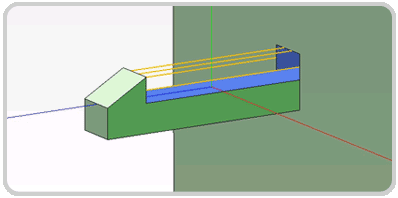
In most cases, ejector pads (or the vestiges left by their removal) are on the non-cosmetic sides of parts. In some cases, however, this may not be possible. Take for example the case of a clip formed using a pass-through core (see Figure 3). In this case, because the clip increases the surface area of that side of the part, the “clip-side” part surface will adhere more strongly to its mold half. This will make that mold half the B-side. The clip would normally be on the cosmetic side of the part, but its presence requires that ejector pads also be on that side of the part.
All of the above cases assume that there are surfaces against which pins can push to eject parts from the mold. There are, however, some designs in which there are no such surfaces. Take, for example, a grate, in which all that faces into the B-side mold half are the tops of ribs. If the rib edges do not provide enough surface area for the pins to push against, the designer would need to add some bosses to act as ejector pads.
In most cases, ejector pin placement is a relatively minor concern in the early phases of part design. Protomold will propose pin placement when an order is placed and present a pin and gate layout for customer approval. At that time, Protomold will address any questions or concerns and make changes, if necessary, to meet customer requirements.
The views, opinions and technical analyses presented here are those of the author or advertiser, and are not necessarily those of ULProspector.com or UL Solutions. The appearance of this content in the UL Prospector Knowledge Center does not constitute an endorsement by UL Solutions or its affiliates.
All content is subject to copyright and may not be reproduced without prior authorization from UL Solutions or the content author.
The content has been made available for informational and educational purposes only. While the editors of this site may verify the accuracy of its content from time to time, we assume no responsibility for errors made by the author, editorial staff or any other contributor.
UL Solutions does not make any representations or warranties with respect to the accuracy, applicability, fitness or completeness of the content. UL Solutions does not warrant the performance, effectiveness or applicability of sites listed or linked to in any content.